
Shoe Bead Flag tutorial
- monicackennedy
- Nov 12, 2025
- 3 min read
We're going to take things back to the 1980's, when life was totally rad. This tutorial came about when planning an activity for a church group. This years theme is Walk With Me.

What you will need:
8/0 seed beads (you can do smaller or larger beads based on the size of your safety pins).
1.3" safety pins
Pliers
Small flathead screwdriver
Design guide (included below)
First step is to open the coil of the safety pin so the other pins can be secured to the backside of the pin. This will allow the main pin to be opened without all the other pins falling off.

I found this to be easier with an extra small flathead screwdriver. Other suggestions were to use a butter knife, but I just couldn't get that to work. With a screwdriver you are going to wedge the end in the coil and simply rotate the screwdriver to push the coil apart. It does not need to be separated by a lot.
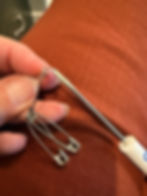
Next, you will slide on 9 safety pins with the pointed end facing up. You want the pins to all open the same direction - so this step is crucial. You don't need to keep the added pins open while you put them on. This is simply to demonstrate. As you put a pin on you will flip it through the coil and they will go to the back of the pin,

Close the main pin once all 9 pins have been put on the back side. You can then use the pliers to reclose the coil if you with. I left mine open and have not had an issue with the pins moving around. Now to the beads. I poured a small amount of beads onto a container lid and worked over the lid. It did a good job of keeping the beads contained, even if I dropped one.

Once all the beads are on the flag and all the pins are closed, you will now use pliers to pinch the opening of the 9 beaded pins (not the main pin). This will ensure the pins don't open up and drop all their beads.

Many bead flags I've seen do not have an additional pin on the bottom. I like to keep my flag in place by securing the bottom as well. This is also handy if you are attaching the flag to a shoe.

And it's that easy. These can be customized by changing the colors and patterns. For more intricate designs you would need thinner pins and smaller beads, allowing you to use more pins and more beads. I went with standard sizes to make it easier for youth to work with.

These guides were designed for a church activity. I first designed the WWM (Walk With ME) and then decided to make a more simplified design with the soundwave for "walk." Both designs are included in the free download below. Technically they are equal in difficulty, with 9 beads on each of the 9 pins. But for your visually distracted girls, the soundwave is easier to see as it comes together.
I found it best to work from the top right corner down. But no matter which pin you start with, you will add the beads from the top of the guide, working down.
FREEBIE


